Showing posts with label Appetizers. Show all posts

Feb 8, 2010

Grilled Loaded Potato Skins


These skins were the break-out hit of our Super-Bowl Party.
Everyone loves the Loaded Potato skins at 0ur favorite restaurant,
I just never thought about making them at home.
I think the slight smoke flavor from the grilling makes these MUCH better!

There are two problems with the restaurant skins...
They are fried!
They are expensive!

These are SO much better and SO easy to make!

And... I'm gonna show you how.

Dana's Grilled Loaded Potato Skins

Ingredients
  • Medium potatoes (as many as you like, but remember! each potato makes 2 skins!)
  • Shredded cheddar cheese (or your favorite cheese)
  • Melted butter , or non-stick cooking spray
  • Your favorite potato toppings, (sour cream, bacon, chives, Shredded BBQ, etc..)
Directions

- Scrub clean potatoes.
- Bake potatoes in a pre-heated 350 degree oven until fork-tender, approx 1 hour.
- Heat outdoor grill to medium High.

- Remove potatoes from oven and cut each in half.
- Allow potatoes to cool slightly.
- Using a spoon, carefully scoop the potato flesh out of the skin, leaving approx 1/2inch thick shell.

- Brush the cut side of the skins with melted butter (or spray em with nonstick cooking spray)
- Place potatoes, cut/scooped side down onto your hot grill.
- Grill until golden brown and crispy, approx 4 minutes. (watch these suckers! they can burn fast!)
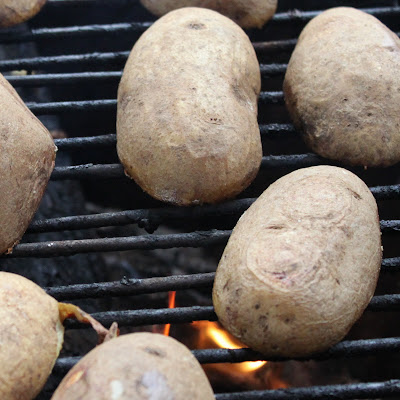

- Flip the skins over.
- Sprinkle with cheese.
- Grill until cheese is melted (2-4 minutes)

- Serve Immediately with your favorite potato toppings.
  • Sour Cream
  • Chopped BBQ
  • Chives
  • Bacon
  • Broccoli
  • Scrambled Eggs
  • Anything!
Enjoy!!


Subscribe via e-mail.

Enter your email address:

Delivered by FeedBurner


Subscribe in a reader
Click For Full Recipe »
Pin It!

Jan 21, 2009

Salad Shells, salad you eat with your hands!

I first made this salad when I was catering my sister-in-laws baby shower.
The foods were all finger foods, I had cheese balls, fruit and dip, a veggie tray, spinach dip with bread, sweets, lots of yummy foods..
But something was missing.
We needed a salad dish.

I love salads.
I especially love pasta salad!
How do you make a salad into finger food?
Instead of pasta salad....
I decided to make a salad IN pasta!
It turned out great!
It makes a wonderful presentation.
And now this is a salad I make often.

It takes a little more work than a "normal" salad.
But it is worth it and no one will forget this salad!

Dana's Salad Shells.

This is more of a technique than a recipe.
Start with a box of large pasta shells. (the ones made for stuffing)
Cook the shells per package instructions, DO NOT OVER-COOK!!

As soon as the shells are done cooking, remove them from the boiling water into an ice-water bath, to quickly cool them and halt the cooking process.

While the shells cool, make your salad.
You can put anything you want into the salad, but all of the ingredients must be shopped into very small pieces, this way you can really stuff the shells.

I used
finely shredded lettuce,
salami,
diced cucumbers,
diced tomato,
thinly sliced green onion,
Shredded cheese.

You can use any dressing you choose.
I like to use a creamy garlic Italian.

Toss the dressing with your salad ingredients.

Remove shells from ice water, and set on a towel to dry slightly.
Stuff each shell with a handful of salad.

Place your stuffed shells into a shallow baking dish and refrigerate at least 1 hour to meld flavors.
Serve these to your guests at your next party and be prepared for oooh's and ahhh's!

Tips...
Try stuffing shells with, Seafood Salad, Tuna Salad, Avocado salad, or chicken salad... the possibilities are endless!


Photobucket
Click For Full Recipe »
Pin It!

Jan 5, 2009

Dog Bread.

The Little-Foreman-in-Pink and I decided we wanted something new for lunch.
That little girl could eat kolaches and pigs-in-a-blanket until she bursts!
I thought it was time to update those good old finger foods.

Today Dog Bread was born!
Dana's Dog Bread.

Ingredients
  • 3 Hot Dogs
  • 1 package refrigerated crescent rolls
  • shredded cheddar cheese (American slices work well too!)
Directions
  • Preheat oven to 375 f degrees.
  • On a lightly greased cookie sheet, Unroll crescent roll dough to form a large rectangle, pinching any seams closed so you have one large piece of dough.
  • cut the dough into three equal rectangular pieces (each piece should be large enough to wrap around a hot dog)
  • Place one hot dog lengthwise in the center of each dough rectangle.
  • sprinkle approx 1 Tablespoon of cheese on the hot dog.
  • fold the dough over the hot dog pinching the ends and seam closed.
  • Using a very sharp knife, cut the hot dog into slices, being careful NOT to cut through the dough seam. See Picture below.
  • Starting at one end of the hot dog/dough roll, flip/turn one hot dog slice over the seam and lay it on it's side.
  • The next slice just lay over onto the baking sheet. This will leave one hot dog slice showing on each side of the seam. (see picture below)
  • continue alternating slices until you reach the end of the dough.
  • Bake in a 375 f degree oven for 12-16 minutes, or until lightly browned.
  • Enjoy!
The Little-Foreman-in-Pink enjoys hers with catchup, I like it plain.

Ain't that Pretty?


Photobucket
Click For Full Recipe »
Pin It!
Pin It!
Related Posts Plugin for WordPress, Blogger...