Showing posts with label Kitchen. Show all posts

Mar 25, 2009

Everybody Loves Pie! (Spaghetti Pie)

Everybody loves pie right?

Apple Pie,
Cherry Pie
Pecan Pie,
Blueberry Pie,
Lemon pie,

I could go on and on, because I love pie!
In fact, I think we should eat pie every day!

What kind of mother would I be if I served pie every night for dinner?
Well... if it's this pie, I'd say a pretty darn great one!

Take a look at this!!

Let Them Eat Pie!!!


Dana's Spaghetti Pie
  • 6 ounces spaghetti
  • 2 tablespoons margarine
  • 1/2 cup grated Parmesan cheese
  • 2 eggs (well beaten)
  • 1 cup cottage cheese (or Ricotta)
  • 1 lb lean ground beef
  • 1/2 cup chopped onion
  • 1/4 cup green pepper (chopped)
  • 1 (8 ounce) can diced tomatoes
  • 6 ounces tomato paste
  • 1 teaspoon sugar
  • 1 teaspoon Italian seasoning
  • 1/2 teaspoon garlic (chopped)
  • 1/2 cup mozzarella cheese
Directions
  1. Cook spaghetti as directed on package, Drain, set aside in a bowl.
  2. Add margarine, Parmesan cheese and eggs to the pasta.
  3. Mix well.
  4. Press noodle mixture into the bottom of a greased 10 inch pie pan.
  5. Spread cottage cheese over spaghetti.
  6. Brown ground beef; add onion, garlic, green peppers. Drain off excess fat.
  7. Add diced tomatoes, paste, sugar, spices to the meat mixture.
  8. Stir to combine and heat thoroughly.
  9. Spread meat sauce over spaghetti and cottage cheese.
  10. Bake in oven at 350 for 20 minutes.
  11. Sprinkle on mozzarella cheese and bake 5 more minutes.
  12. Slice and Enjoy!
My Grandmother used to make a spaghetti pie.
I've tweaked it to our liking.. feel free to do the same to suit your taste!


Photobucket
Click For Full Recipe »
Pin It!

Mar 23, 2009

The Taste of Comfort

Last night, we had one of my favorite comfort foods for dinner.


Tender, juicy, slow roasted, pot roast
with roasted carrots, huge mushrooms,
onions, & fingerling potatoes.
mmmmmmmm!

Top it all with a rich and thick homemade gravy, and I'm in comfort-food heaven!

Pot roast brings back memories of Sunday After-Church dinner.
Walking in the back door and smelling the wonderful meal long before you reached for your fork.
It's warm, filling, honest food. (if the term "honest food" makes any sense at all!)

I have many favorite comfort foods.
some sweet,
some savory,
some simple,
some complex,

I always find it interesting what foods other people consider comforting.

So today, It's all about you!

I wanna know...
What does comfort taste like to you?
And Why?

Photobucket
Click For Full Recipe »
Pin It!

Mar 19, 2009

My Chinese Leftovers can Beat Up Your Chinese Leftovers! (Shrimp Lo Mein)

I love Chinese food.
I really love Chinese food!
But.. there is NO Chinese food in the sticks.

I have done a really good job learning how to make my favorite restaurant foods at home.

Not only can I control exactly what goes into our foods,
It's WAY cheaper to make it myself!
I can usually make a meal for my entire BIG eating family, including left-overs, for less than one or two servings would cost at a restaurant!

My burgers are better than any burger joint.
My steaks are better than any fancy steak house steaks.
I am the queen of deli-style sandwiches and Paninis!
I am thrilled with my Vietnamese spring rolls!
My Pizza is getting close!

But Chinese food always kind of intimidated me.
I didnt' even know where to start!

Until NOW!

Yummy looking huh?


I could never figure out what spices and seasonings made Chinese food taste like Chinese food.
I tried soy sauce.... nope.. something else.
I tried 5-spice.. good but not the taste I was craving.

then.. BINGO!!
Enter sesame oil & fresh ginger!!
DING DING DING!!! We Have a Winner!!

the combination of-
soy sauce
sesame oil
fresh ginger
and garlic
IS the Chinese food taste!

Now... don't let the fresh ginger scare you.
I have always said I didn't like ginger.
But.. I do!
as the subtle taste in the background that brings Chinese dishes together and makes them sing to your soul!

I did the work..
and Now.. I'm gonna show you how!
Here we go!
Dana's "Better than Take-Out"
Shrimp Lo Mein.

  • 2 lbs medium shrimp, peeled and deveined
  • 1/2 cup soy sauce
  • 3 Tablespoons cornstarch
  • 3/4 Tablespoon fresh ginger, peeled (using a knife or vegetable peeler) finely chopped or grated.
  • 6 cloves garlic, minced
  • 4 teaspoons sesame oil, divided
  • 12 ounces snow peas
  • 1 1/2 cups shredded carrots
  • 1 head bok choy
  • 1 (14-15 ounce) can chicken broth
  • 7 green onions, sliced
  • 1 small can water chestnuts, sliced
  • 1 bell pepper, sliced into thin strips
  • 12 ounces spaghetti noodles, cooked al dente and drained

Directions-
  1. Combine first 5 ingredients in a bowl and set aside to marinate while you get the other ingredients prepped.
  2. In large skillet or wok, heat 2 tsp sesame oil over high heat.
  3. Drain shrimp, reserving marinade.
  4. Over high heat, cook shrimp until pink, 2-3 minutes.
  5. Remove shrimp from skillet into a large bowl, set aside.
  6. Add 1 tsp sesame oil to the skillet, then add snow peas and carrots, and cook approx 2 minutes.
  7. Remove from skillet add to the bowl with the cooked shrimp.
  8. Cook cabbage, water chestnuts & pepper in skillet with the remaining sesame sesame oil for approx 2 minutes.
  9. Remove cabbage mixture to a large clean bowl combine with cooked/drained spaghetti noodles & green onions, set aside.
  10. Combine chicken broth and reserved marinade, stirring well to stir up the settled corn starch, add to the skillet, along with shrimp mixture.
  11. Bring to a boil, over high heat, and cook until thickened, 2-3 minutes.
  12. Remove from heat and pour over the noodle/veggie mixture, toss to coat.
  13. Enjoy!!

Photobucket
Click For Full Recipe »
Pin It!

Mar 18, 2009

Get an Early Taste of Summer!

Several years ago, my spoiled rotten little sister attended college in Arkansas.
My mother and I went to visit her.
While we were there, we stopped at a restaurant called "The Market Place", I ordered what may possibly be the BEST salad I have ever eaten!

It had chicken breast, fresh strawberries, roasted pecans, water chestnuts, & spinach.
The dressing was a blueberry dressing.
It was wonderful!

I loved this salad so much that I made my poor mother smuggle an ice chest full of salad home on the plane each time she would visit my sister.

I have tried and tried to replicate this salad.
I managed to make some pretty darn tasty salads, but they were not quite right.
UNTIL NOW!
As a matter of fact...
I think mine is better!

Dana's "Taste of Summer" Salad
  • Chicken breast, or breast tenderloin, grilled.
  • 1 lb spinach (I like baby spinach)
  • 1 pint strawberries, sliced
  • 1 small can mandarin orange sections. (drained)
  • 1/2 cup pecans or cashews, toasted
  • 1 can water chestnuts, sliced (optional)
  • Blue Cheese or Feta cheese, for sprinkling

Dressing

  • 1/3 cup raspberry vinegar (or balsamic vinegar)
  • 1/3-1/2 cup sugar or sugar substitute
  • 1 teaspoon dry mustard
  • 1/4-1/3 cup vegetable oil
  • 1/2 cup blueberries (Frozen work great!)
Directions
  1. Grill your chicken breasts or tenderloins, set aside to cool slightly.
  2. Toast nuts in a pan over low heat, set aside to cool.
  3. Combine all the dressing ingredients EXCEPT blueberries, in a blender and blend well.
  4. Add thawed or fresh blueberries to the dressing and pulse to combine. set aside.
  5. Arrange salad ingredients on plates, drizzle with dressing and serve immediately.
  6. ENJOY!


    Photobucket
Click For Full Recipe »
Pin It!

Mar 16, 2009

Shamrock Shakes!

When I was a child we waited all year for the month of March.
Not because we wanted to get busy in the garden.
Not because it was time for Spring Break.
We longed for March because March is the month of the Shamrock Shake!

All McDonalds restaurants served Shamrock Shakes during the month of March.
It was green.
It was minty.
It was refreshing.
Its kinda like a Thin Mint Girl Scout cookie. except, its cold, green and you can suck it through a straw!!
Whats NOT to love???

I'm not usually a fan of mint drinks.
But I just have to have a Shamrock Shake every March!

Did you know that I have not had a Shamrock Shake in almost 10 years????
I know!! It's almost unbelievable!!
Well, it turns out that very few McDonalds in Texas carry it!
CRAZY!
This year, I was bound and determined to find one.
I called more than 45 Houston area McDonalds to no avail.
Most of the employees who answered my phone call didn't even know what a Shamrock Shake was!!

I even called the McDonalds cooperate headquarters!
I mean.. they have to know who they shipped the Shamrock Shake stuff to right?
WRONG!
They couldn't tell me!

Whats a girl to do?
Make her own Shamrock Shake thats what!!

Behold....
Dana's Shamrock Shake copy-cat!

Not too shabby, if I do say so myself!

Yum, slurp, groan!
By George!! I think I got it!!

Dana's "I don't need no stinkin McDonalds!"
Shamrock Shake

Ingredients
  • 2 cups vanilla ice cream
  • 1 1/4 cups milk
  • 1/4 - 1/2 Teaspoon Mint extract
  • 9 drops green food coloring
Optional pretty stuff
  • chocolate syrup (optional glass decoration)
  • whipped cream (optional topping)
  • green sugar (optional decoration)
Directions
  1. Blend all ingredients together until smooth and yummy.
  2. drizzle some chocolate syrup around your glass.
  3. Pour Shamrock Shake into the glass.
  4. top with whipped cream and green sugar.
  5. ENJOY!!
Happy St Patrick's Day!!


Photobucket
Click For Full Recipe »
Pin It!

Mar 1, 2009

One of the Best Broccoli Salads in the World EVER!!


I love a good salad!
Whenever I get a chance to visit my mother and sister in Houston, we go to a great salad bar restaurant called Sweet Tomato.

They have everything you could ever dream of putting on a salad!
But they also have some prepared salads.
This one is my favorite of all time!
Even the kids love it!
There is the crunch of the broccoli, combined with sweetness from the dressing and plump raisins....
Combined with cashews and some crumbled bacon.

I do not usually enjoy raw broccoli, but I can eat this salad by the feedbag full!

Dana's Best Broccoli Salad In The World EVER!
(inspired by Sweet Tomato)

Salad
  • 3-4 heads worth of broccoli florets , cut into bite-sized pieces
  • 1 medium red onion, diced finely
  • 3/4 cup salted cashew halves, broken
  • 3/4 cup raisins
  • 6 slices bacon, crisp-cooked & crumbled
Dressing
  • 1 cup mayonnaise (or 1/2 cup mayo & 1/2 cup plain yogurt)
  • 5 Tablespoons vinegar (I like salad vinegar)
  • 3 Tablespoons sugar
  • Dash of freshly ground black pepper
Directions -
  1. Combine all the salad ingredients together in a large bowl.
  2. In a small bowl, whisk together the dressing ingredients.
  3. Pour dressing over salad, mix to coat.
  4. Refrigerate for a few hours to develop flavors. It's best when made the day before!
  5. Enjoy!!
**TIP** Kimmie emailed a wonderful suggestion for those unable to eat nuts.
Substitute water chestnuts for the cashews! YUMMM!
Thanks, Kimmie!!


Photobucket
Click For Full Recipe »
Pin It!

Feb 25, 2009

Sorry Grandma... "Better Than Grandma's Oatmeal Raisin Cookies"

Grandmothers all over the world will shed a sweet tear today.
Today we will ALL (well.. everyone who reads this post) learn how to make those fabulous, comforting, sweet, chewy, oatmeal cookies that they made for us when were children.
The thing is....
I bet you these will taste even BETTER than theirs!

No... They won't come with her warm smile,
The soft, rose-water scented, hugs,
They won't be served on her pretty china,
You won't get the crumbs wiped off of your cheeks with her thread-bare apron...
You won't see that familiar twinkle in her eye as she sneaks you an extra one after your mother said "Not ONE More Cookie!".

But I promise!
The taste is there!!
And now YOU can make your own traditions around the most comfort-filled cookies of all comfort foods!

Tie on an apron for Grandmas sake and lets get down to business!!


Dana's
"Better than Grandma's Oatmeal-Raisin Cookies"


Ingredients

Dry Ingredients
  • 2 Cups all-purpose Flour
  • 1 teaspoon baking soda
  • 1 teaspoon baking powder
  • 1 teaspoon Kosher Salt
Wet Ingredients
  • 1 Cup Unsalted Butter (I have used "regular" butter with great results too!)
  • 1 Cup Sugar
  • 1 Cup Dark Brown Sugar (firmly packed)
  • 2 Large Eggs
  • 2 teaspoons Vanilla
Then Add
  • 3 cups oats (NOT instant)
  • 1 & 1/2 cups raisins
Directions
  1. preheat oven to 350 degrees f.
  2. whisk dry ingredients together, set aside.
  3. combine wet ingredients with mixer on low speed to combine; Turn mixer speed to HIGH and cream together until color lightens and the mixture is light and fluffy.
  4. Stir the flour mixture into the creamed mixture until no flour is visible (DO NOT OVER MIX!!)
  5. Add Oats and raisins and stir to combine.
  6. Drop Approx 2 tablespoons of dough onto a greased cookie sheet spaced about 2 inches apart.
  7. Bake 11-13 min (on center rack of oven) until golden, but still moist in the cracks.
  8. cool on cookie sheet for approx 2 min before removing to a wire rack to cool completely.
  9. ENJOY!!
I'm off to find Rose Water...

Photobucket
Click For Full Recipe »
Pin It!

Feb 14, 2009

Creme Brulee.. The dessert of LOVE.

It's Valentines Day!
The Man-of-My-Dreams is still working out of state,
but I'm not gonna let that stop me from having a wonderful Valentines Day treat.

Sure... chocolates are nice.
Cake is yummmy.
You can almost never go wrong with Ice cream.
There is a cookie that fits any occasion.
But the day that celebrates Love must have something special.
When I think decadent, creamy, love.. I think Creme Brulee!


Now... You all know by now that I am not a fancy-schmancy kinda cook.
But Creme Brulee is not hard!
It is down right easy if you ask me.
It does take some time.
But there is no reason you cant make it your self.
All you need is Cream, sugar, eggs, vanilla and a few tools.

I'm gonna show ya how!


Creme Brulee
SERVES 8

  • 1 quart heavy cream
  • 1/2 -1 vanilla bean or 1 teaspoon vanilla extract
  • 3/4 cup sugar
  • 10 egg yolks
  • pinch salt
Burnt Sugar Crust
  • 3/4 cup sugar
Directions
  1. Use 6-oz. ramekins.
  2. Heat the oven to 325°F.
  3. Heat the cream or cream and milk in a medium saucepan over medium heat until scalded (you'll see small bubbles on the sides of the pan).
  4. Split the vanilla bean in half, if using, and scrape the seeds into the cream.
  5. Meanwhile, in a medium bowl, slowly whisk the sugar and salt into the egg yolks.
  6. Slowly temper the hot cream into the sugar/yolk mixture.
  7. Strain the mixture through a fine sieve into a pitcher or measuring cup.
  8. Stir in vanilla extract if using.
  9. Arrange the ramekins in a baking dish with deep sides, pour the mixture into the ramekins, Fill the baking dish with water to come halfway up the sides of the ramekins and cover the dish with foil.
  10. Bake until just set, 25 to 50 min.
  11. Remember to start checking early; baking time will depend on the thickness and depth of your ramekins and baking dish.
  12. Carefully remove the baking dish from the oven and let the ramekins cool in the water bath.
  13. Remove, cover with plastic wrap and refrigerate at least 2 hours or up to 2 days.
  14. Topping: sprinkle a light layer of sugar over each cold creme brulee just before serving.
  15. Caramelize either using a propane torch by passing over the sugar or putting under a broiler.
  16. ENJOY!!!
*TIP* when making your sugar topping, it's better to brown two thin layers of sugar than to use one thick one... because with a thick layer you will end up with burnt sugar (and the burnt sugar taste!) on top and the sugar underneath will not melt.

I was very excited to use my kitchen torch!!
I got a little carried away...
Tomorrow, I'll show ya what a lonely woman on Valentines Day with a bottle of wine & Torch can do in a kitchen.


Photobucket
Click For Full Recipe »
Pin It!

Feb 11, 2009

Hog in a Quilt. (kolaches, TEXAS size!)

Mmmm, doesn't this look good?

I'm sure that at some point in your life you have eaten a "pig in a blanket".
Here in Texas we eat tons of Kolaches, usually at breakfast time,

Its a soft roll-like bread baked around a sausage, maybe some cheese, jalapeno, Ham & Cheese, you name it!

We eat more kolaches for breakfast than we do donuts!

I often cheat and make dozens of kolaches using refrigerated crescent dough, wrapped around some "Little Smokies" sausages w/ half of a slice of cheese.
They bake up flaky, golden brown, cheesy, and disappear off of the baking sheet before I have a chance to set it on the counter!

Well, we all know by now that I can never leave a good thing alone.
I have to find a way to make it better!
Thats how "Hogs in a Quilt" was developed tonight.

In Texas we like things big.
The Men-folk round this farm can eat through 3 dozen normal-sized kolaches in mere minutes.

I had to find a way to make em last longer!
Sooo.

I cheated and used the same good old crescent roll dough from the store.
I filled it with our favorite green onion ring smoked sausage from our home-grown pork.
Tossed in some cheese,
a few got jalapenos,
some got BBQ sauce.
I rolled em up and baked them.

WOW did they turn out great!!
They were big enough to be a whole meal that you can hold in your hand!

These will definitely be made again to send out to the men-folk on those early mornings when they go out to work fences before dawn!
You don't have to be a great cook!
You can cheat and use some store bought ingredients.
Just take something your family already loves, and change it up to suit your needs!

Take a chance in the kitchen!
You'll be glad ya did!

Photobucket
Click For Full Recipe »
Pin It!

Feb 9, 2009

Bacon Cheeseburger EXPLOSION!


By Now, most of you have heard about the Bacon Explosion recipe created by The BBQ Addicts.
If you haven't, you have GOT see their incredible creation HERE.

Their genius and creativity got me thinking...
Everything is better with bacon right? We all know that!
So, why not use their idea and make a bacon cheeseburger using the Bacon Explosion technique?
Instead of cooking individual hamburger patties topped with bacon, Why not cook it all together, wrapped in a bacon weave, then just slice it to use on the bun?

So, thats just what I did!
And, I'm gonna show you how!

Bacon Explosion Cheeseburger.

  • First, I made a bacon weave just like they did.
  • Then I slathered it with my favorite BBQ sauce.
  • Next, I pressed some lean ground beef out onto the bacon weave I pressed it to make sure it was an even layer (approx 1/2" thick) .
  • I sprinkled my favorite spice rub over the ground beef.
  • Then I sprinkled it with finely shredded Cheddar cheese & a few handfuls of crisp-cooked bacon pieces
  • I rolled the whole thing up tightly.
Ain't it purdy???

  • I tied it up with cooking twine, because I was making a larger, bun-sized roll, and I needed the twine to help hold the bacon ends in place.
  • Tossed my beautiful "Log-O-Meat" into the smoker. (seam-side down)
  • I smoked it at approx 250 degrees F. until the internal temperature reached 160 degrees f.
  • I removed the kitchen twine.
  • Then I coated it, one more time, with my favorite BBQ sauce.

This is what it looked like after smoking for a few hours.


I let it rest for a few minutes while I gathered my burger makin supplies.
  • Buns
  • Cheese
  • Onions
  • Mayo
  • BBQ Sauce
  • Pickles
  • Anything your heart desires!
Then we sliced our Beautiful Bacon Cheeseburger Log.

I gotta say...
This was one of the BEST burgers I have ever had!
Smoking it gave it that "Can't be beat" flavor.
And the bacon?? Lord Help Me! took it over the top!

Next time, I think I'm gonna stuff it with grilled onions for me,
and some jalapeno peppers for the men-folk!!

The guys over at BBQ Addicts are Brilliant!!
There are endless possibilities to this technique!

Experiment! You'll be glad you did!

Photobucket
Click For Full Recipe »
Pin It!

Feb 5, 2009

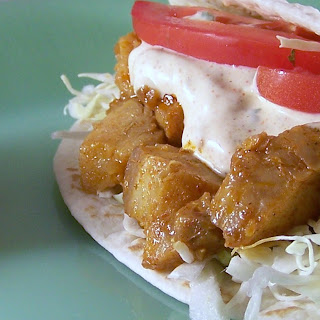
Something's Fishy 'Round Here... "Fish Tacos"

Fish tacos??
Thats what my young'uns cried when I told them I was making fish tacos for dinner.
Yep! Fish tacos! I said.
They were scared....
Until they tried them!

Don't you be scared too!
They are YUMMY!

If all 5 of my young folk will inhale them,
they HAVE to be good!
They are NOT fishy.
They are mild, refreshing, and something new.
And, I'm gonna show ya how to make 'em!

Dana's Fish Tacos

Ingredients

  • 1/2 cup sour cream
  • 1/2 cup mayonnaise
  • 1/3 cup chopped fresh cilantro
  • 1 package taco seasoning mix, divided (or make your own!!)
  • 1 lb cod, pollock, or other white fish fillet, cut into 1 inch cubes
  • 2 tablespoons vegetable oil
  • 3-4 tablespoons lemon or lime juice
  • 1 (12 count) package flour tortillas or taco shells, warmed

    Toppings

    • shredded cabbage
    • tomato
    • lime juice
    • pico de gallo
    • taco sauce
    • cilantro (if you like it)
    • special sauce (recipe below)

    Special Sauce
    (This is what makes them sooo good! Don't skimp on it!)

    1. In small bowl, combine sour cream, mayonnaise, cilantro and 2 tablespoons taco seasoning, and 1 tablespoon lemon or lime juice.
    2. Chill.

    Fish Tacos
    1. Combine fish, vegetable oil, lemon or lime juice, and remaining taco seasoning in medium bowl.
    2. Stir gently to coat well.
    3. Pour into large skillet.
    4. Cook, stirring constantly, over medium-high heat for 4 to 5 minutes or until fish flakes easily when tested with a fork.
    5. Fill taco shells with fish mixture.
    6. Top with toppings & plenty of Special Sauce.
    7. Enjoy!!

    Step out of your comfort zone!
    Try something new!!
    You'll be glad ya did!
    Photobucket
Click For Full Recipe »
Pin It!

Feb 1, 2009

Bricken (Brick Chicken)

I'm not the only thing getting skinnier on this farm!


Look at this chicken!
(BBQ bricken)
It's what we call "Bricken" or... Brick Chicken.
It may look a little funny,
But once you make brick chicken, you'll fall in love!
Cooking your chicken under a brick accomplishes several things..

You get crispy skin (almost as crispy as fried chicken!).
Juicy tender meat,
And the thighs & legs are done BEFORE the breast dries out and becomes tough!

These are all the things that I have been striving for with a roast chicken, but it just never quite worked out.
My breasts would be cooked perfectly, but the thighs and legs would be too rare.
The skin would never get quite as crispy as I wanted.
Now, don't get me wrong.... I make a mean roast chicken...
But Brick Chicken is even better!

I'm gonna show ya how!

First, you need something to weight the chicken down with.
I use bricks...
You do not need to use HUGE monster cinder blocks, if you don't want to.
You can use "normal" bricks, or even a cast iron pan.
You just want something heavy that will schmoosh your chicken and is safe to use in the heat of your oven, smoker, or grill.

You are going to use a whole chicken.

To prepare your chicken, take a very sharp knife or good strong kitchen shears. (I actually went to the hardware store and bought a brand new pair of tin snips that I use exclusively for cutting up whole chickens. They are cheaper, last forever, and can cut through ANY bone!)

Carefully cut your chicken down the back. Starting on one side of the little tail-flap, cutting all the way along the backbone.
Repeat on the other side of the back bone, removing the backbone completely. (This is also called "spatchcocking" your chicken.)

Gently spread open your chicken and lay it flat.
It will look kind of backwards to what you are used to seeing, because it's cut down the back instead of between the breasts... that's okay - enjoy your thing of beauty!


Season your chicken any way you like.
I suggest marinating it in your favorite marinade. Yum!

Now cover your bricks with aluminum foil and toss 'em in the oven for awhile to get really nice and hot. (I like to use a 400° F oven for about 15 to 20 minutes)

Now is when you need to decide how you plan to cook your bricken.
Do you want to use your oven? Your grill? Your smoker?

If you use your oven, you need a large, very heavy pan. Cast iron is perfect for this!
Coat your pan with oil, and heat the pan over medium heat until hot.

Place your chicken into the pan, skin side DOWN.
You should hear it pop & crackle... thats fine! You are crisping your skin!
Press the chicken into the pan well.. you want total contact between the skin and the hot pan.

Carefully remove your bricks from the oven and press them down onto your chicken.
(or use a second hot cast iron pan; weigh it down as much as possible!)
Reduce oven temperature to 375° F.

Turn the heat to medium-low and cook for approximately 20 minutes.
Check your chicken.. take a peek at the bottom/skin side. It should be golden brown and crisp.. if it is not, turn up the heat a little bit and cook for another 5 to 10 minutes.

Remove weights and flip your chicken over, being careful not to rip off any skin that sticks to the bottom of your pan! (A wooden spoon helps scrape & separate it easily.)
Replace your bricks/weights and continue cooking in your 375° F oven for approximately 20 more minutes or until juices run clear. (This will depend on the size of your chicken, 20 minutes is for an approximately 3 to 5-pound chicken.)

Using your grill is just about the same as using your oven, although I like to use more indirect heat during the second phase of cooking, and direct heat for the first/browning phase.

I prefer to use my smoker.
This is what my Bricken looked like when I first put it into the smoker; before I remembered I was supposed to put it in skin side DOWN!

I get my smoker nice and HOT (approximately 400°)
Put my chicken in skin side down.
Cover it with my bricks.
And let it cook for approximately 30 to 45 min.

When the skin is nice and crisp, I flip the bricken over to skin side UP.
And reduce the heat to approximately 250° F, and let it smoke under the bricks until juices run clear.
I was using BIG chickens, so this took me about 2 1/2 hours.
During the last hour of cooking, I removed the bricks and basted the bricken with my favorite BBQ Sauce.


Now...
Doesn't that look GOOD??

Go forth and schmoosh your chickens!!

Enjoy!!


Photobucket

Click For Full Recipe »
Pin It!
Pin It!
Related Posts Plugin for WordPress, Blogger...